ISLAND 5 · SCIENTIFIC TIER · CHECKED AUG 28, 2026
How to Fish Volcano Island
Complete Walkthrough
Volcano is the fifth and final story location. Follow the coordinates earned from the Albatross Head, complete the Scientist’s fish request, use the Fish Bucket to defeat Bowhead Whale, carry the whole whale body to the crater, beat Mutated Bowhead Whale without stepping into lava, and return the Whale Fin for the military-boat key.

Volcano route at a glance
The finale has two separate fishing steps and two linked whale fights. The regular Scientific Lure is used to satisfy the Scientist and build the five-creature collection pool. The quest reward, Fish Bucket, is then used for Bowhead Whale. The defeated whale is not the final reward—it becomes the physical summon for Mutated Bowhead Whale when carried to the crater. The final Whale Fin must still reach the Scientist before the story exit is unlocked.
1. Arrive with a ranged weapon, healing, and empty space
Volcano is not a good place to discover that your inventory is full. Before leaving Rocks, finish the Albatross Head exchange, save the new coordinates, bank extra ordinary catches, and reserve room for Scientific fish, the Fish Bucket, the Bowhead body interaction, and the Whale Fin. Bring a reliable ranged gun you already understand rather than spending every dollar on an unfamiliar weapon after landing.
Minimum story loadout
- Radar or recorded Volcano coordinates from Rocks.
- One dependable ranged weapon with adequate ammunition.
- Healing food in a clearly separated slot.
- Scientific Lure money and several free inventory spaces.
- A clean save made after the Albatross Head hand-in.
Useful but not mandatory
- Assault Rifle for consistent moving-target damage.
- Magazine and recoil upgrades you can afford.
- Extra food for two consecutive whale fights.
- A co-op caller who watches jumps and lava lanes.
- Storage space for optional Scientific collection catches.
The analyzed older route uses an Assault Rifle and high bullet upgrades, but no specific damage target is required here because difficulty and balance patches change the math. The practical test is whether you can keep moving while placing controlled shots. If your current ranged gun can do that and you have enough ammunition for two boss health bars, it is a valid story weapon.
2. Buy the $500 Scientific Lure and fill the Scientist’s counter
Find the yellow-suited Scientist beside the shore shop. Current independent guidance and the analyzed shop frame both place the regular Scientific Lure at $500. Buy the ordinary version first. Do not accidentally buy or equip the Scientific Boss Lure: that one belongs to the optional Goblin Shark collection branch and does not replace the Scientist’s quest loop.
There is a small source disagreement worth handling honestly. One current walkthrough reports that the Scientist’s counter accepts any five fish, while another describes five native Volcano catches. The safest route is to land five fresh creatures with the Scientific Lure at Volcano. This satisfies the stricter interpretation, fills the final regular collection tier, and avoids arriving with old bodies that fail to increment the objective. After each hand-in, check the Scientist’s counter or dialogue before catching the next one.
- Start the Scientist dialogue.Activate the quest before assuming carried fish will count.
- Equip the regular Scientific Lure.Read the full item name; the Boss version is for Goblin Shark.
- Catch and secure one creature at a time.Kill it away from lava and water, then confirm the pickup.
- Deliver and watch the counter.If a body does not increment the quest, switch to a fresh Scientific catch.
- Collect the Fish Bucket.Do not leave the NPC until the special Bowhead summon is visible in inventory.
3. Identify the five regular Scientific creatures
The owner-provided encyclopedia records five regular Volcano entries in the Scientific tier. Values below are reported base values from that capture, not guaranteed final sale prices. Weight, cooking, Killscore, a rare Drip state, and patches can change the actual amount. For the story quest, the important signal is whether the Scientist’s counter advances—not which of these names has the highest base value.
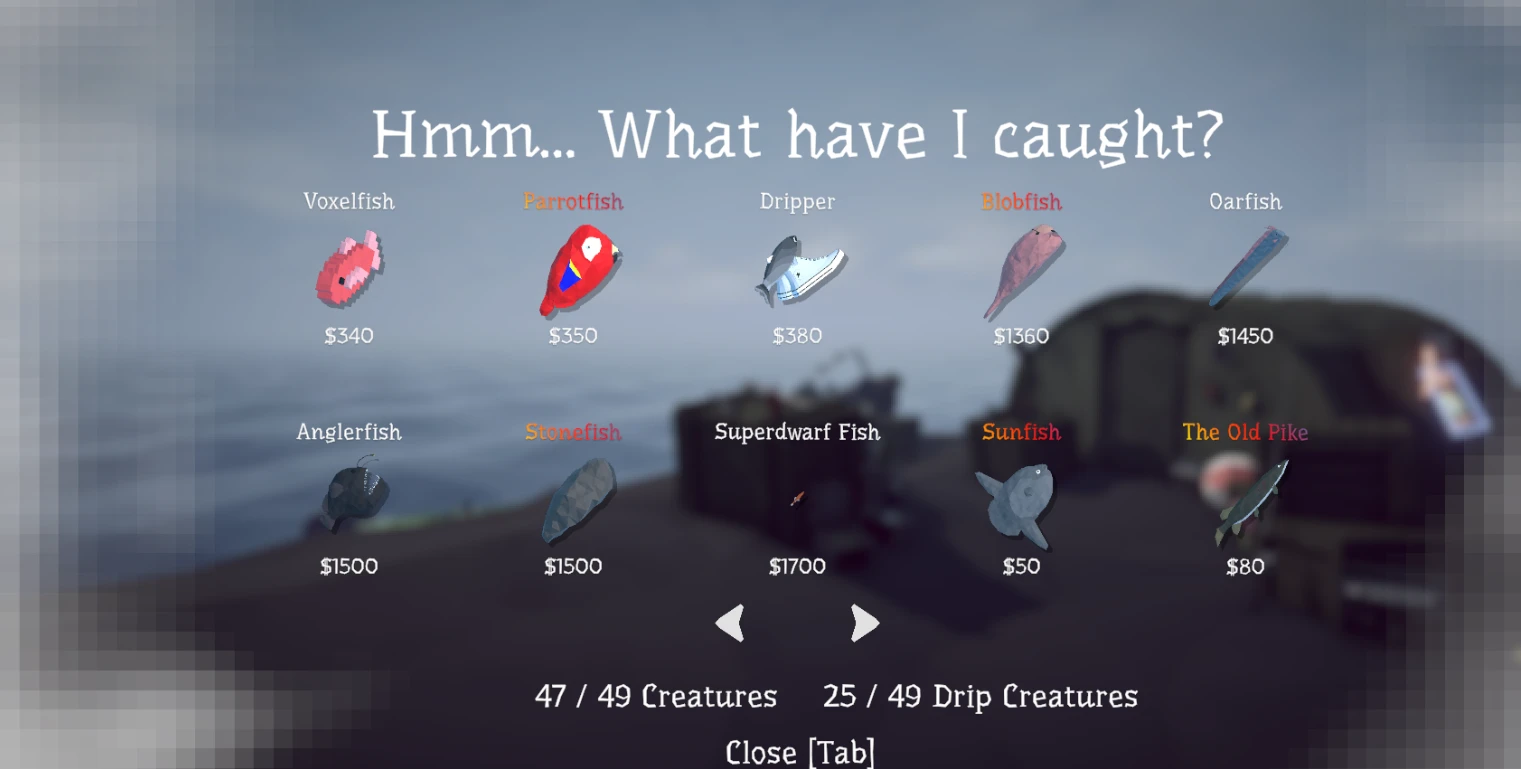
Superdwarf Fish has the highest reported base value in this five-entry set; Blobfish is the lowest. If you continue fishing for money after the quest, keep ordinary sale bodies well away from the Bowhead staging area so you cannot grab the wrong object during the finale. Current money guidance also reports that Volcano lava can apply the maximum 1.50× cooking bonus immediately without a burn timer, but treat the lava edge as a deliberate economy tool only after the story bodies are safe. Never test it with Bowhead Whale or Whale Fin.
4. Use Fish Bucket and run when Bowhead Whale jumps
With the Fish Bucket in inventory, choose a broad flat lane away from the water and lava. Put your ranged gun in the next accessible slot, heal before casting, and leave a clear path inland. Bowhead Whale is enormous and can hide your view when it closes distance. Its most readable danger cue is becoming airborne: when the body rises, stop firing and sprint laterally or away from the landing line. Resume shooting only after the body slam finishes and the whale’s direction is readable again.
Confirm the Scientist reward, then cast from a landing lane that keeps the body on usable ground.
The camera can fill with the whale. Track whether it is grounded, charging, or lifting for a slam.
Do not trade damage under an airborne whale. Sprint out of the landing line and preserve health.
Use the recovery after a missed charge or body slam for controlled shots, then rebuild distance.
Do not let the fight drag you into the ocean or across a lava seam. A safe circle on plain black ground is better than chasing the boss for one extra burst. In co-op, one player calls the jump while both move in the same direction; splitting across the whale can make it turn unpredictably and land on the recovering player.
5. Keep the whole Bowhead body and carry it to the crater

When Bowhead Whale dies, stop firing and secure the whole body. Do not carve it into meat, cook it, sell it, or leave it beside ordinary fish. Before beginning the carry, reload, heal, and confirm you still have ammunition for the stronger mutated fight. Once the body reaches the crater trigger and the transformation begins, your preparation window is effectively over.
- Clear the route first.Walk the path without the body and identify continuous black ground around every lava seam.
- Heal and reload.The mutated fight begins after the crater step; prepare before placing the body.
- Carry the whole body.Keep the large whale centered and move slowly enough to avoid dropping it into an unreachable edge.
- Approach from the safe side.Use the wooden or black-rock route rather than jumping across glowing lava.
- Place or throw it into the crater trigger.Back away as soon as the transformation state is accepted and draw your ranged weapon.
6. Beat Mutated Bowhead Whale by moving first

Mutated Bowhead Whale repeats the large-body pressure of the first fight but adds a more aggressive pace and a lava-filled arena. Current walkthroughs describe charges, body slams, and lava pressure; the analyzed route visibly demonstrates repeated airborne attacks and warns the player away from glowing pools. Survival comes before damage. Keep a broad lane, watch the whale rather than the crosshair, and move before an attack reaches you.
Do not backpedal while staring through a scope. That is how players step into lava. Keep the weapon at a wider view during movement, then aim only after the whale lands or passes. If the boss throws or scatters lava into your previous lane, rotate around the outside instead of squeezing through a glowing gap. A smaller guaranteed shooting window is better than dying with half a magazine unused.
The white bar beneath the health display is the encounter’s escape timer. You still need steady damage, but hiding or running so far that the fight disengages can waste the entire chain. The correct rhythm is one safe attack window per boss pass: move, confirm the miss, fire, reload while repositioning, and repeat.
7. Protect the Whale Fin and unlock the military boat
After the mutated whale falls, stop shooting and search the immediate landing area for the Whale Fin. This is the final protected quest drop. Pick it up before food, meat, or optional sale loot, then return to the yellow-suited Scientist. The finale is complete only when the Scientist accepts the Fin and awards the key for the RHIB or military boat used to leave for the mainland ending.
Save after the Scientist hand-in and verify the key in inventory before boarding. Developer Island and other optional discoveries are not required to make Volcano count as the fifth story location. If a new coordinate or side route appears after the finale, treat it as postgame exploration; do not postpone the Whale Fin exchange or risk carrying the unique drop across the ocean.
Optional: Scientific Boss Lure and Goblin Shark
Goblin Shark belongs to the Volcano collection tier but is separate from the main Bowhead finale. Current lure references pair it with the Scientific Boss Lure. The Scientist’s five-fish request, Fish Bucket, regular Bowhead body, Mutated Bowhead Whale, and Whale Fin are the story dependency; Goblin Shark is an optional completion branch.
Finish the story first unless you have enough money, ammunition, and recovery to risk another special cast. This page does not invent a current lure price or boss damage pattern because the analyzed segment does not cleanly establish that encounter. When you attempt it, use the same safe special-cast routine: verify the full lure name, clear a landing lane, heal, equip the ranged gun, leave inventory space, and preserve any unique drop until you understand its purpose.